
Egg tart is easily one of my favorite pastries back in Asia. Ever since moving to Germany, I have been craving for Asian food because I do not really get them here. Since I could not get these here, I will have to bake them myself. To my surprise, chinese egg tarts are actually easy to make. All you need is just a little practice and a few ingredients. Today, I am going to show you how to make chinese egg tarts at the ease of your own kitchen!
Just a little background information. There are mainly 2 famous types of egg tarts from where I come from, one of which is inspired by Portugal (Macau) and another type is the Hong Kong Style (probably inspired by the British). I personally prefer the chinese egg tarts (aka Hong Kong Style egg tarts) because of its delicious buttery crust. It is so crusty yet so smooth. Each bite feels like it is melting in your mouth. So let me show you how to make chinese egg tarts now!
How to make chinese egg tarts – The Crust

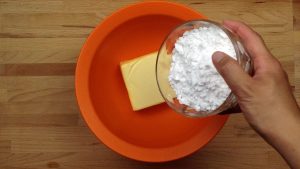
Just like other tart desserts, it is usually seperate into two parts – the crust and the filling. I recommend making the crust first because it does need some time to rest. In a mixing bowl, add sugar and vanilin sugar to the butter and whisk the ingredients.
I personally love using high quality Irish butter to bake because of its soft consistency even at cooler temperature and it enhances the taste of the pastry. However, this is optional. Thereafter, add one egg and all purpose flour to the mixture and combine everything.

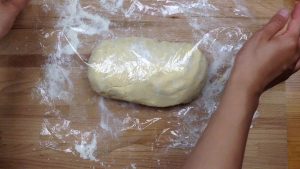
Once you are done, spread a generous amount of flour onto your working top and knead the dough. Knead the dough until it is smooth and non-sticky. After which, wrap a cling wrap over the dough and let it rest in the fridge for at least 15 mins.

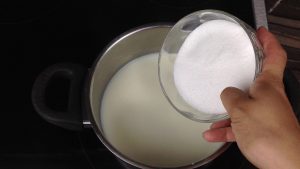
While the dough is resting, we are going to warm up some milk in a small pot and add in the sugar to dissolve it. Turn off the heat. Let the milk-sugar mixture cool down. While the milk-sugar mixture is cooling, we could work on the dough again.
Forming the Egg Tarts
Firstly, thinly coat your muffin tray (or tart forms) with some butter and spread a little flour over the each mould. This is to ensure that the tart shells do not stick onto the tray after baking.
Once the dough is well rested, take it out of the fridge and spread some flour onto the working area, your hands and a rolling pin. I find it easier to work on smaller pieces. Therefore, I cut the dough roughly into 3 pieces and preheat the oven to 180°C.
Let us work on the first piece of dough and cover the rest with cling wrap, so that they do not dry out. Roll out the dough to a thickness of approx. 3-5 mm. The tart shells should not be too thin, as they would break when you try to get them out of the muffin tray. Due to high content of butter, the dough may be really soft to work with. In this case, you can feel free to spread more flour on the working top and your hands.
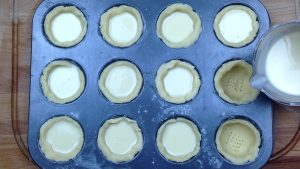
Cut them with a cookie cutter or in my case, with a cup. Place them over the muffin tray and use your fingers to press them down gently into the mould and gently use the fork to prick a few holes on the crust.
How to make chinese egg tarts –
The Custard Filling
Once the milk-sugar mixture is cooled down, add the whisked eggs, vanilla extract, a pinch of salt and the cream into the mixture. Sift the mixture to get rid of any clumps.

Pour the custard filling into each crust. The filling should fill up roughly 80% of the crust. Bake your egg tarts in the preheated oven for 20-25mins (depending on your oven) or when they turn golden brown. Once it is done baking, take the tray out, poke one tart with a toothpick to see if the filling is cooked (if the toothpick is clear) and let them cool for about 10 mins before trying to get them out of the tray. You can serve your egg tarts either warm (which is extremely delicious) or at room temperature.
You may also enjoy these posts:
How to store Chinese Egg Tarts

These egg tarts can be easily stored up till 2 to 3 days, when they are kept in an air tight container. You can either keep these pastries in the refrigerator or in a cold dark place such as the cellar. I personally prefer storing the tarts in my cellar because they remain soft, crusty yet moist. However, if you are in doubt, you can also store them in the refrigerator. Just keep in mind that the tarts will turn harder, when they are kept in the fridge but you can easily warm them up in the oven or the microwave.
I hope that you enjoy this simple recipe! Tell me your experience in the comment section and show me your creation by #chenguins in social media. I would love to stay in contact with you!
Until next time & guten Appetit!
Love,
Pia
Watch how to make this recipe
Print this recipe
Simple Chinese Egg Tart Recipe
Equipment
- Muffin Tray/ Tart Moulds
- Rolling pin
- Pastry brush
- Electric mixer
Ingredients you need
Ingredients for the Crust
- 250 g Butter at room temperature
(I prefer using Irish Butter) - 300 g All purpose flour
- 1 Egg
- 100 g Icing Sugar
- 1 Packet Vanilin Sugar
Ingredients for the Custard Filling
- 140 g Sugar
- 200 ml Milk
- 300 g Cream
- 3 Eggs whisked
- A pinch of salt
- A few drops of vanilla extract
Directions
- In a bowl, add both icing sugar and vanilin sugar to the butter and whisk the mixture with an electric mixer on medium speed until it is fluffy and soft. You can whisk the mixture with your hand too.
- Add one egg to the mixture and mix it again.
- Now add the all purpose flour to the bowl and combine all ingredients.
- Once you are done, spread a generous amount of flour onto your working top and knead the dough. If it is sticky, just spread a little more flour on the table and onto your hands. Knead the dough until it is smooth and non-sticky. After which, wrap a cling wrap over the dough and let it rest in the fridge for at least 15 mins. The longer, the better. While the dough is resting, we could move on to making the custard filling.
- Over a medium heat, warm up milk in a small pot and add in the sugar to dissolve it. Turn off the heat. Let the milk-sugar mixture cool down.
- While the milk-sugar mixture is cooling, we could work on the dough again. Firstly, thinly coat your muffin tray (or tart forms) with some butter and spread a little flour over the each mould. This is to ensure that the tart shells do not stick onto the tray after baking.
- Once the dough is well rested, take it out of the fridge and spread some flour onto the working area, your hands and a rolling pin. Cut the dough roughly into 3 pieces and preheat the oven to 180°C.
- Let us work on the first piece of dough and cover the rest with cling wrap, so that they do not dry out.
- Roll out the dough to a thickness of approx. 3-5 mm. The tart shells should not be too thin, as they would break when you try to get them out of the muffin tray. Cut them with a cookie cutter or in my case, with a cup. Place them over the muffin tray and use your fingers to press them down gently into the mould and gently use the fork to prick a few holes on the crust.
- Once the milk sugar mixture (Step 5) is cooled down, add the whisked eggs, vanilla extract, a pinch of salt and the cream into the mixture. Sift the mixture to get rid of any clumps.
- Pour the mixture (Step 10) into each crust (Step 9). The filling should fill up roughly 80% of the crust.
- Once you are done, bake your egg tarts in the preheated oven for 20-25mins (depending on your oven).
- Once it is done baking, take the tray out, poke one tart with a toothpick to see if the filling is cooked (if the toothpick is clear) and let them cool for about 10 mins before trying to get them out of the tray. You can serve your egg tarts either warm (which is extremely delicious) or at room temperature.

Pin for later


0 Comments
Trackbacks/Pingbacks